3D File Setup in OpenRoads Designer
Table of contents
This document will guide you through the proper set up of 3D Project files. Proper setup is essential to data management and a project’s future success.
3D files should only be used for modeling. For S&C, this will primarily for drainage modeling. We don’t model utility or SWPPP files.
Creating 3D drainage design files
-
Navigate to the project in ITD ProjectWise.
- The project is usually located in PWITD > Documents > District or HDR_US_West_01. You’ll be given the appropriate file path and name at the start of the project.
-
Find the project-specific seed file, usually located in the Design folder or in the Project Resources folder.
- The seed files, created by the prime, contain coordinate information. Using this file creates a standard across the project and eliminates any errors in file set up. ITD standard line styles, text, and cell libraries will be imported by using the prime’s seed file Always use the Seed files created by the prime.
-
Right click on the 3D seed file.
-
Select Copy.
-
Paste the file into the Design folder.
-
Select No Wizard in the pop-up window and continue.
-
Rename the pasted file to the appropriate convention.
-
Typical naming convention for a 3D Drainage file:
20442_DRAIN_S02.dgn- The letter delineator, here “S”, is set by the prime, typically in a CAD Tech memo. This is to show which firm has ownership of each file. S&C typically uses “S” as its delineator. If “S” is unavailable, we default to “C”.
-
-
Add a description (e.g., 3D Drainage Modeling)
-
Open the renamed file
- Attach any pertinent reference files. See Tips & Tricks for information on referencing. Make sure all references are attached using Coincident World.
- Typical references for all files:
- Topo
- Existing Surface
- Proposed Surface (often not available in early stages of a project)
- Aerial Imagery
- Design Files
- Alignment
- Typical references for all files:
-
Click Fit View in the View menu bar.
- Close the file.
Creating working drainage design files
Working files are not yet ready to be available for others to reference or view.
-
Navigate to the project in ITD ProjectWise.
-
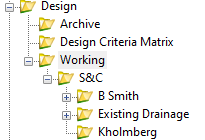
Navigate to Design > Working > S&C >Your Working Folder
- If a working directory does not yet exist, create it.
- To create a new folder in ProjectWise, in the menu bar, click Folder > New Folder
- Add a folder with your first initial and last name:

- If a working directory does not yet exist, create it.
-
Find the project-specific seed file, usually located in the Design folder or in the Project Resources folder.
- The seed files, created by the prime, contain coordinate information. Using this file creates a standard across the project and eliminates any errors in file set up. ITD standard line styles, text, and cell libraries will be imported by the prime’s seed file Always use the Seed files created by the prime.
-
Right click on the 3D seed file.
-
Select Copy.
-
Paste the file into your working Design folder.
-
Rename the pasted file to the appropriate convention with
_Working.dgnat the end.- Typical naming convention for a 3D Drainage file:
20442_DRAIN_S02_Working.dgn- The letter delineator, here “S”, is set by the prime, typically in a CAD Tech memo. This is to show which firm has ownership of each file. S&C typically uses “S” as its delineator. If “S” is unavailable, we default to “C”.
- Typical naming convention for a 3D Drainage file:
-
Open the renamed file.
-
Attach any pertinent references.
-
Typical references for all files:
- Topo
- Existing Surface
- Proposed Surface (often not available in early stages of a project)
- Aerial Imagery
-
-
When you are ready to move the file to the Design folder for others to use and reference, remove
_Workingfrom the end. Right click on the file, select Cut, and Paste it into the Design folder.
Archiving files
Once you are done with a file, move it to Design > Working > S&C > Archive. This will help with data management. Never delete files, always archive them. If an Archive folder doesn’t exist yet, create one.